1. Main
window
2. Cuelist window
3. Channel Matrix
4. Moving fixture Controler
5. Channels window
6. Single channel window
7. Chaser config window
8. Quick Start Guide
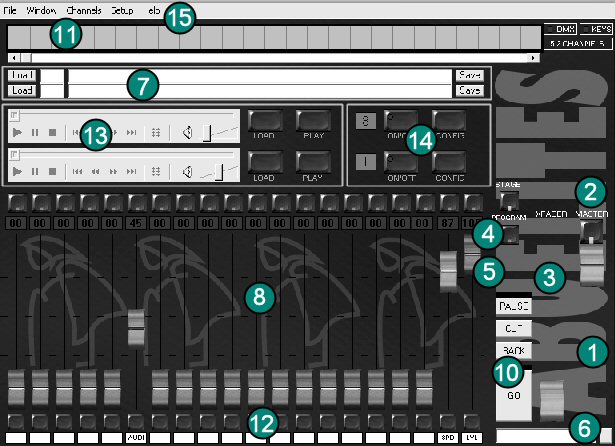
1. Grandmaster level
2. BlackOut button
3. Crossfader
Move to crossfade between loaded cues, when you reach opposite point
next cue will be loaded.
4. Stage button
Selects Stage page, every change you do in channels is sent
to the dimmers.
5. Prog button
Selects Program page, you can modify levels of the channels
of next cue loaded. channels page shows channel levels. changes are sent
to the dimmers when you move crossfader.
6. Direct
Screen
You can change levels of any channel directly on this screen.
Syntax examples:
- 01a80 (channel 1 at 80%)
- 05/20aFF (channels 5 to 20 at FULL)
- 05+08+10/15a00 (channels 5,8 and 10 to 15 at 0%)
- 05+07s10 (adds a 10% to the level of channels 5 and 7)
- 02/04d30 (substract 30% to the level of channels 2 to 4)
changes are sent to the selected page ( Stage, Prog, submaster...)
7. Cue Screen
On the top line you can read cue number and title you have
loaded in stage (current cue) and the cue title on the botton line you
can read cumber and title of cue loaded in program (next cue)
8. Submasters
Each slider controls one submaster level. Click the button
over the submaster to select it and then modify channels with channels
window, single channel window or direct screen.
9. Crossfade
time
Not implemented yet.
10. Auto
Crossfader (Go Button)
Click start to crossfade between scenes on a specified
crosfade time.
11. Channels
screen
You
can see device output here (only raised channels are shown).
12. Submaster
label
You can write a text here to easily remember submaster
contents.
13. Audio
Controls
You can load sound effects or songs here. Player
can be controled directly or using special cues.
14. Chaser
Controls
You can setup and play two chasers. Chaser level
and speed could be controled by faders on main window.
15. Menus
On file menu you can load and save desk setup file.
On Window menu you can load other program windows. Use channels menu to
copy channel values from one submaster to another.
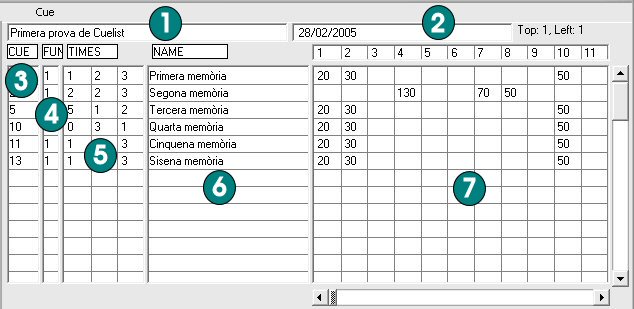
This window shows Status of each cue (scenes).
1. Show tittle
2. Show date
3. Cue Number
4. Cue Function.
There are several types of cue function:
· 1. "normal" or ligthing cues
· 2. Jump to cue number (not implemented
yet)
· 3. Submaster load (not implemented yet)
· 4. Submaster level change
· 6. Run external program
· 7. Show message (not implemented yet)
· 9. Load a single file in program (not implemented
yet)
· 11. Load a single file in submaster 1 (not
implemented yet)
· 12. Load a single file in submaster 2 (not
implemented yet)
· 13. Load a single file in submaster 3
(not implemented yet)
...
· 30. Load
a single file in submaster 20 (not implemented yet)
5. Cue times
Cue Up time, Cue duration, Cue Down time
(not implemented yet)
6. Cue name
7. Channels levels
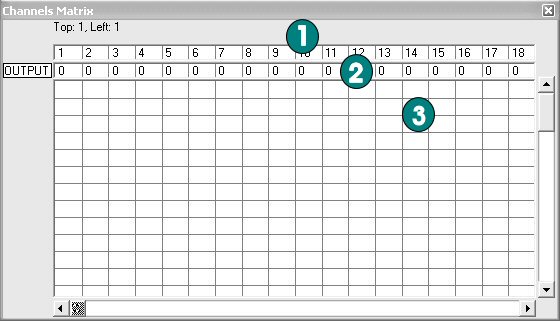
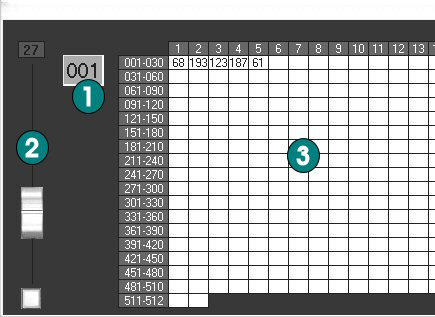
This window shows output levels of every channel.
1. Channel guide
2. Desk Output
Shows device Output
3. Matrix
First line shows Stage channels levels. Second, Program channels levels
(next cue). Third, submaster 1 channel levels. Fourth, Submaster2 channel
levels ...
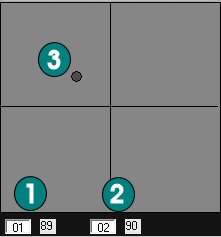
You can control moving fixtures with this screen. Select channel on X axis in (1), channel on Y axis in (2). Click and move (3) to move fixture.
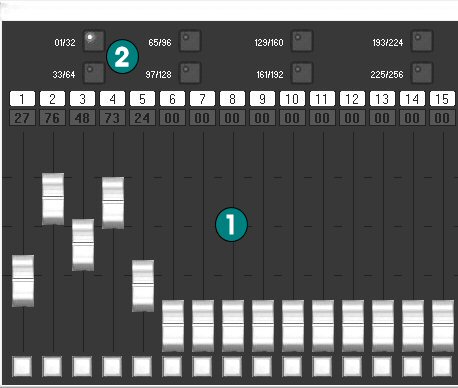
You can raise
channel levels moving sliders (1) as you wish.Change channels page with
(2).
Slider affects channel levels of stage, program or the submaster page
you have selected.
This
window sets levels for single channel of stage, program or the submaster
page you have selected.
Select channel on (1), change channel level with (2). You can see changes
on (3). You can click on (3) to easily select one channel.
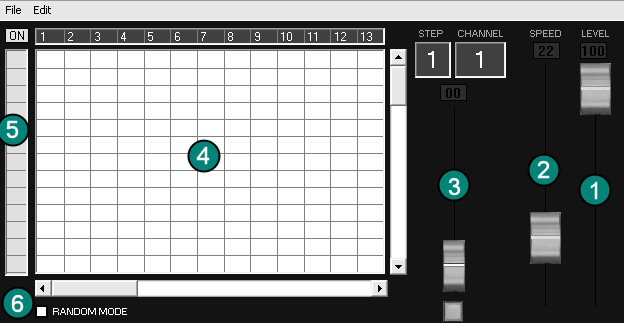
This
window sets chaser channel values, there are two , one for each chaser.
Channels grid (4) shows a chaser step on each row and channels in columns.
Click on the channel and the chaser step you want to modify in the grid
(4), and change channel level with (3). The chaser lenght column (5) turns
red from the first step to last. You can change it if you want.
The
master fader (1) contols chaser output level and speed fader (2) its speed.
For example: if you set grid as follows:

The chaser will turn on channel 1 in first step, channel 2 in second and channel 3 on third.
1. Raise
channel level
Select Stage page on main screen
Open channel window and move a slider
or
Click direct screen on main screen and write a sentence (example: 01a80)
or
Open Single Channel window to control one channel.
2. Program
a submaster
Select the submaster you want to modify by clicking the button
over submasters slider (led blinks)
Raise channels as shown above
Raise submaster level to see changes.
3. Copy one
submaster to another
Create one submaster (see above).
Select channels menu and select copy
select another
submaster
Select channels menu and select paste.
You can paste channels to stage or program page too.
4. Save a
scene (cue)
Click Stage page in main screen
Create a scene, rising a few channels.
Click 1st save button (next to S1 cue screen, the top button) give this
scene a number. Scene is saved in cuelist window.
5. Save a
scene in blind mode
Click Program page in main screen
Create a scene, rising a few channels.
Click 2nd save button (next to P1 cue screen) give this scene a number.
Scene is saved on cuelist window.
6. Load a
cue in scene or program window, crossfade between
scenes
Save a few scenes, give a number to each of them.
To see a scene Click S1 button (next to cue screen on main window) type
the number of the cue you want to load.
To load a scene in Program click P1 button (next
to cue screen on main window), type the number of the cue you want to
load. Move the crossfader slide. Scene will be seen as you move crossfade
level when you reach the oposite side of the crossfade starting point,
next scene will be loaded in Program.